From time to time, an existing case will not come up in the E-Filing system. If the court offers it, you will have the option to File into a Non-Indexed Case. Once the court accepts the Non-Indexed Case filing, you will be able to file on that case by clicking File on an Existing from the dashboard!
These instructions are to File into a Non-Indexed Case; meaning this case already exists, but the court has not entered it into their E-Filing system.
Quick Steps
Scroll down for more detailed instructions.
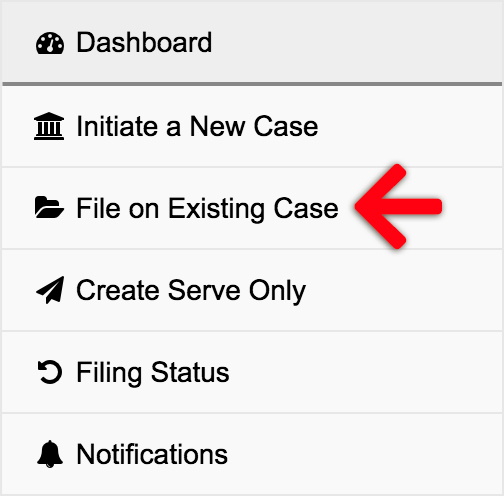
- From the Dashboard, click File on an Existing Case.
- Click the Add a Case link to retrieve your case from the court’s system.
- Look for the Advanced Case Search link if the system doesn’t find the case.
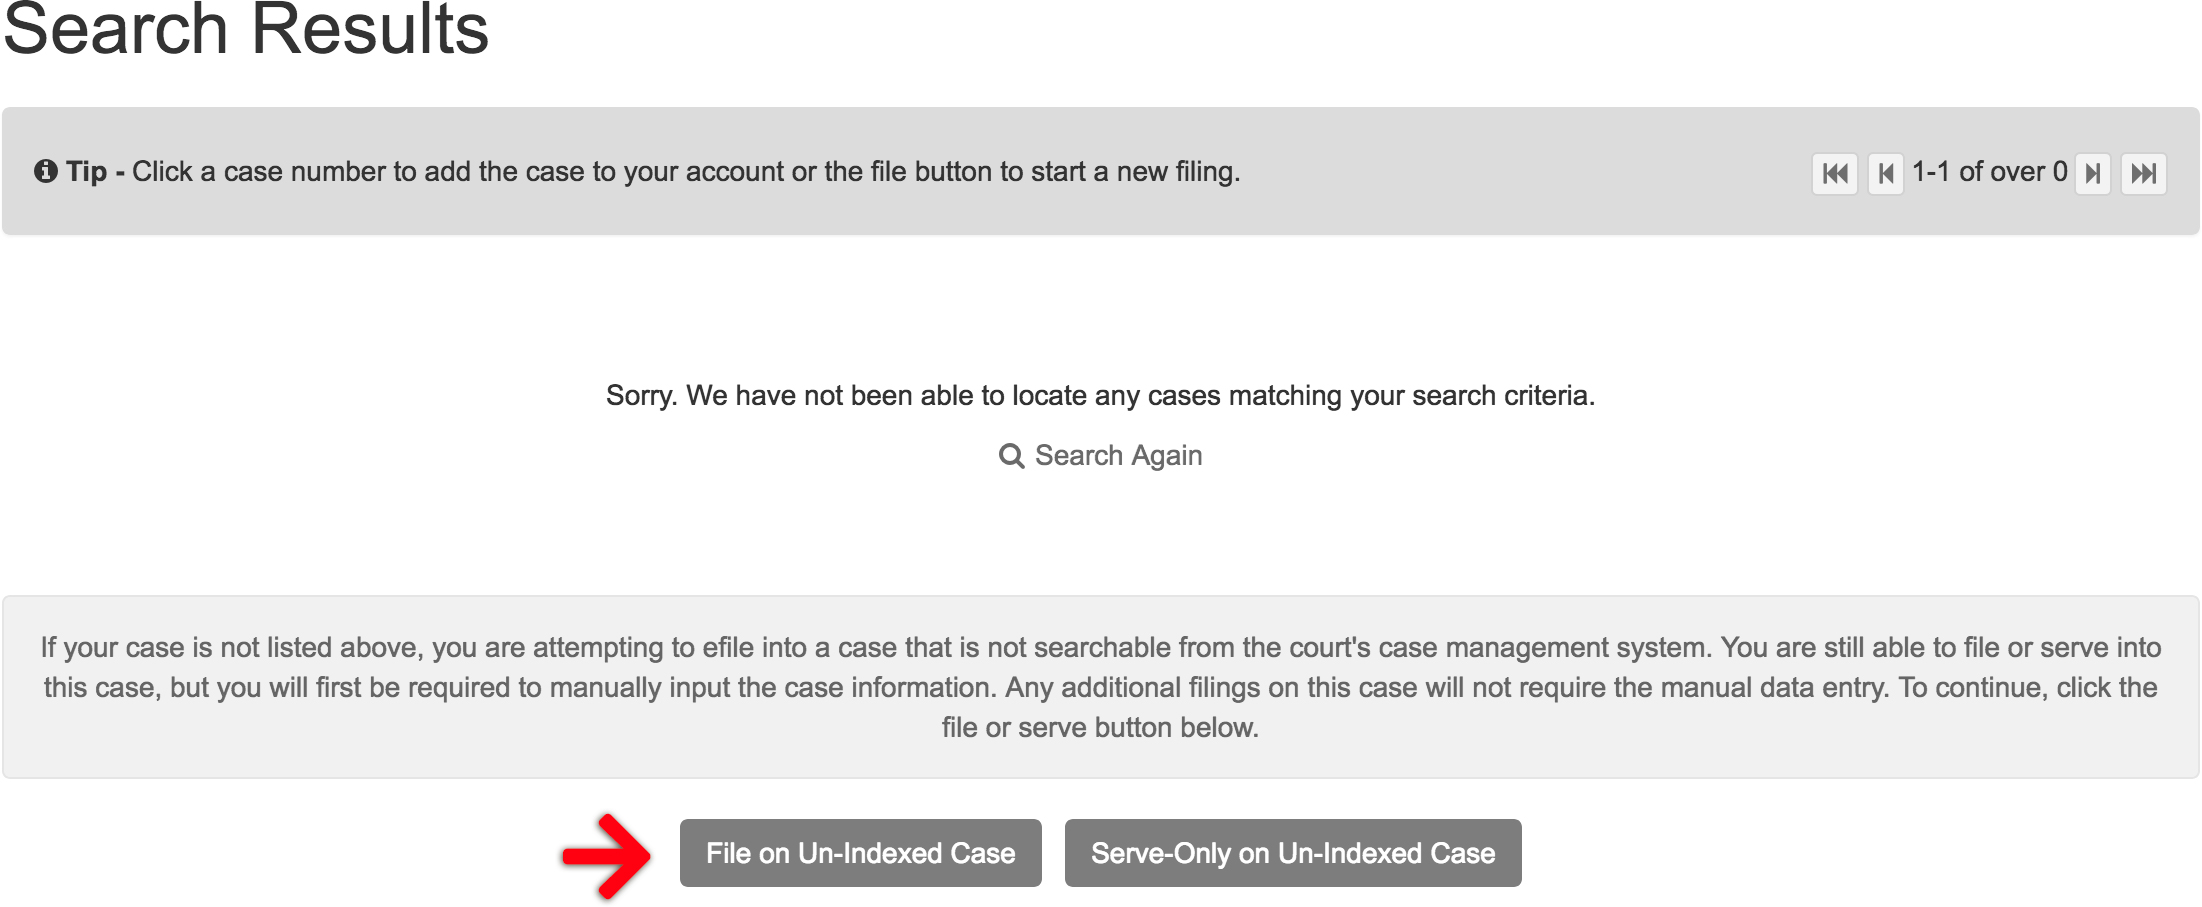
- Click the File Into Existing / Non-Indexed Case link if that search fails as well.
- Click the File into a Non-Indexed Case button.
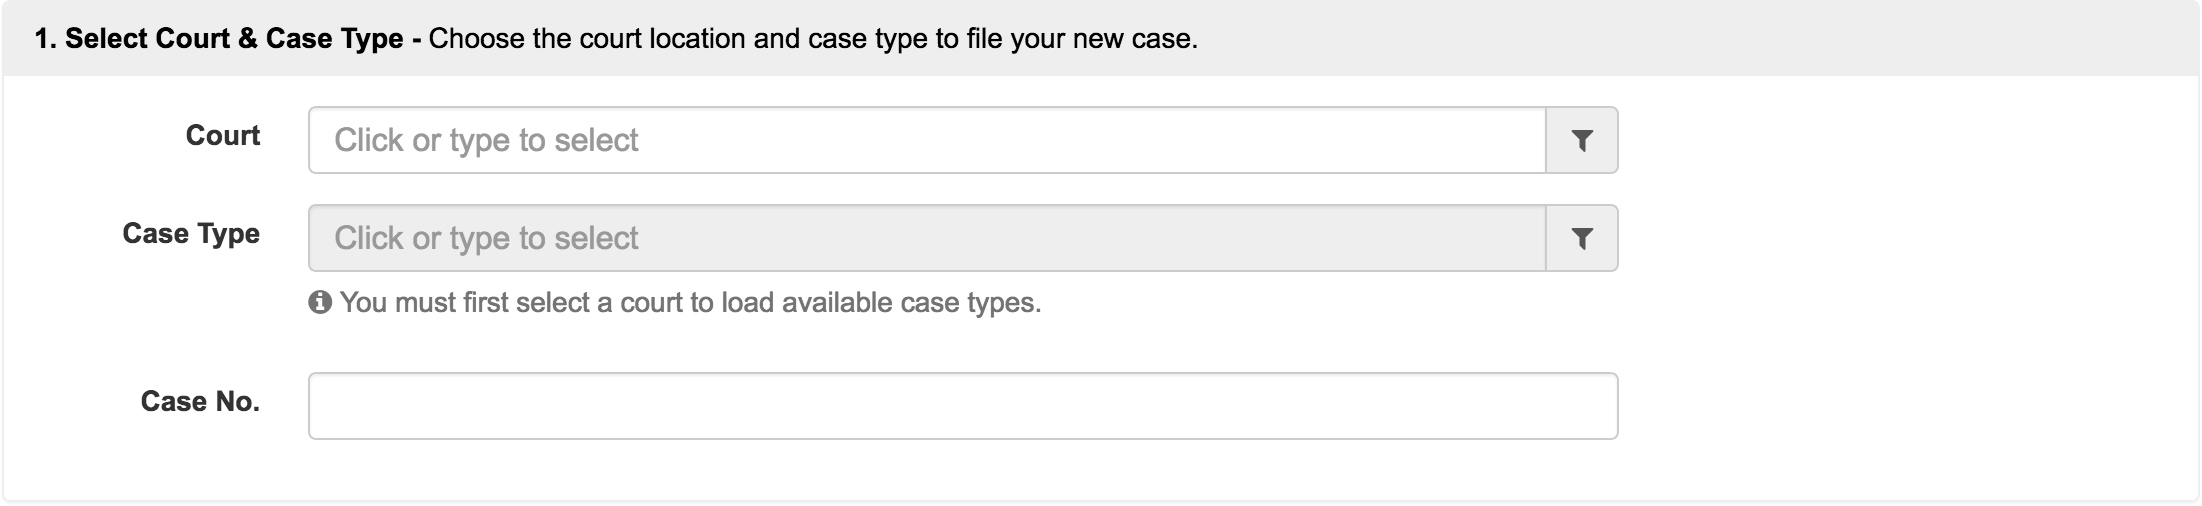
- Select the Court, Case Type and enter your Case Number.
- Select your Document Type and enter a Document Description. Then click the Click to Upload link to add your document.
- Give your document a Security Type, and review your choices in the Optional Services drop down. Select any necessary services.
- Enter your New Case Parties as required by the court.
- Choose the Party or Parties you are filing on behalf of.
- Add any Service Contacts to your filing to perform electronic service.
- Review your Filing Fees, and select a Payment Method to pay the estimated fees.
- Select the Filing Attorney if necessary, review all information for accuracy, and Submit Filing.
Check First to See if the Case is in the System
From the Dashboard, click File on an Existing Case
- Select Case – If you do not see your case in the drop down menu, click the Add a Case link. You may need to do an advanced case search by Party Name if it doesn’t come up on the first try.

- Add a Case – Enter the Court and Case Number. Then click the Add Case button. If Add a Case fails to find any results, click the Advanced Case Search link to do an advanced case search by Party Name.
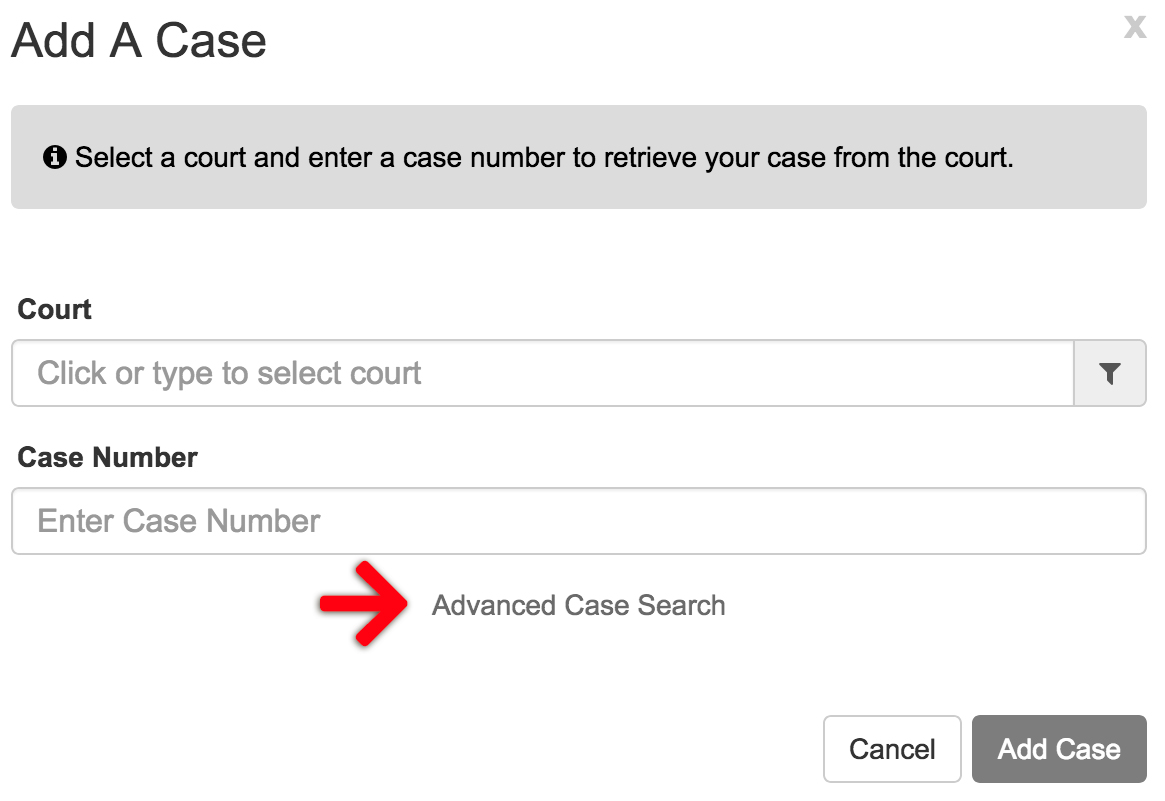
- Advanced Case Search – Enter the Court and a Party information. Then click the Add / Search button. If the Advanced Case Search fails to find any results, click the File Into Existing / Non-Indexed Case link.

- File into a Non-Indexed Case – This will bring you to the Search Results screen. Click the File into a Non-Indexed Case button to begin.
File into a Non-Indexed Case
- Select Court & Case Type – Choose the Court, Case Type, and enter your Case Number.
- Add Documents – Define, select, and upload the documents that make up your filing.

- Select the Document Type: The Court prescribes the list of documents you see available in the Document Type field. If you don’t see the specific document type you are looking for then you’ll need to select the document type that most closely matches, or is somewhat generic in nature. If you enter some of the Document Type name in its form field, you will filter your choices down (ie. type ‘Petition’ to see petition choices). Some courts provide an option like “Other”, “Other Document Not Listed” or “Document – Other” which may work for you as well.
- Enter the Document Description: After making your selection, type the true document title in the document description field.
- Click the Click to Upload link to add your document. We’ll automatically convert most native file formats (i.e. Word, WordPerfect, JPG, PNG, GIF, TIF) into the Court’s preferred Adobe PDF format, upon upload.
- Click the Edit button to edit a description, delete a document, replace a document, or add an attachment.
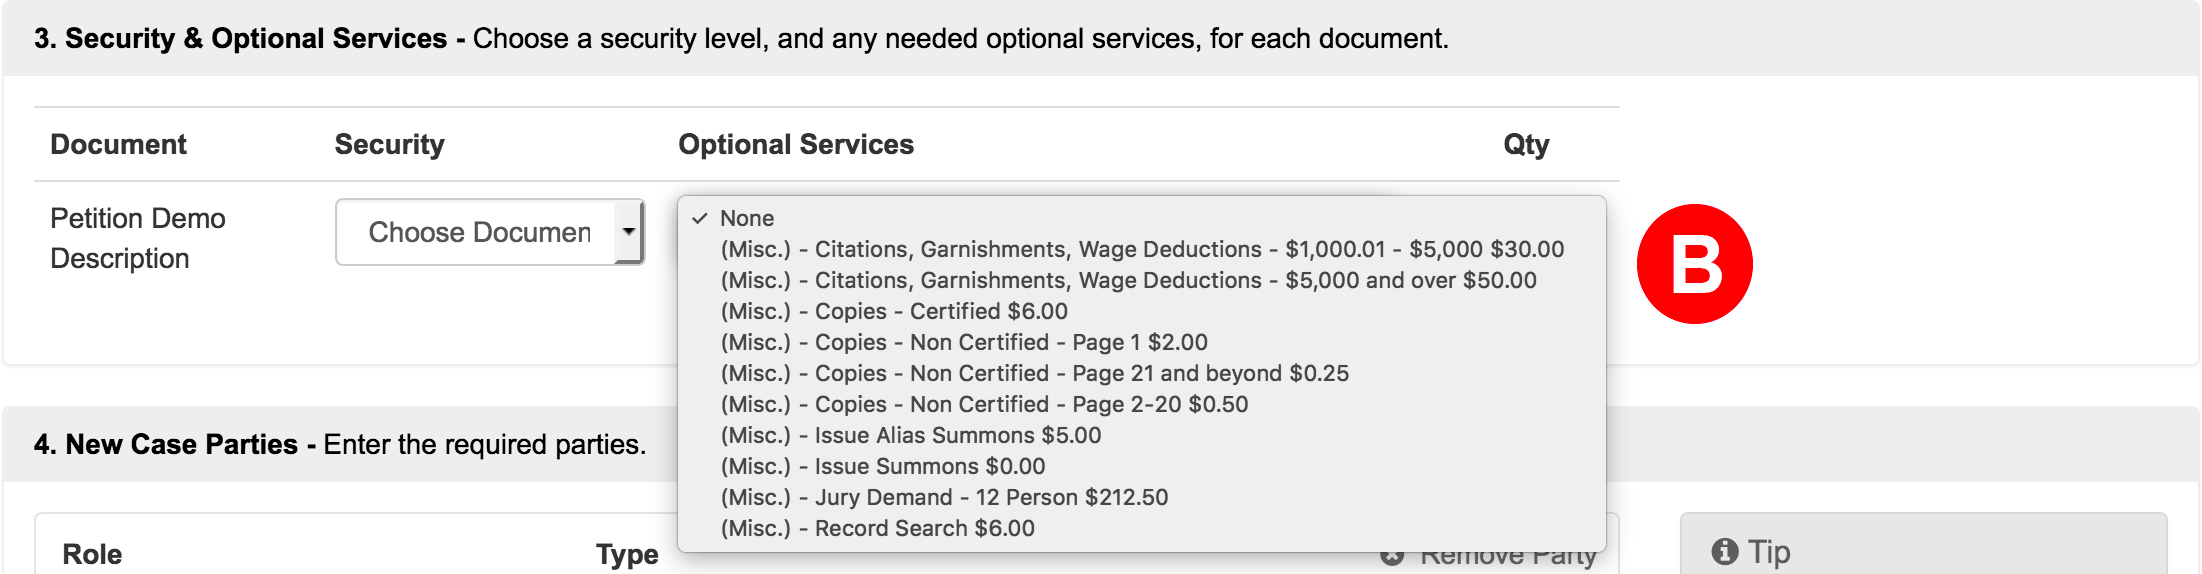
- Security & Optional Services – Choose a security level, and any needed optional services, for each document.

- Choose your Document Security: Most times your choices are public or confidential, but those choices will vary from court to court, and from document type to document type. You will need to pick something from the choices presented to you. While many people choose the public option, others choose confidential if there is sensitive information they do not think should be public.

- Choose any Optional Services: When you initiate a new case or file on an existing case, you have the choice of adding optional services for the document(s) you are filing. This can be for extra fees or services like the court reporter fee or first paper fee, or for extra things like ordering certified copies (if the court offers it). There are many different choices that can appear here, so always be sure to check it before submitting a filing. You can also add a Qty to these optional services if you need multiples of something.
- Choose your Document Security: Most times your choices are public or confidential, but those choices will vary from court to court, and from document type to document type. You will need to pick something from the choices presented to you. While many people choose the public option, others choose confidential if there is sensitive information they do not think should be public.
- New Case Parties – Each case type you choose has required parties that must be defined. You may add more parties by clicking the Add Parties link at the bottom of this section, but you must still have the court’s required roles in order to file.
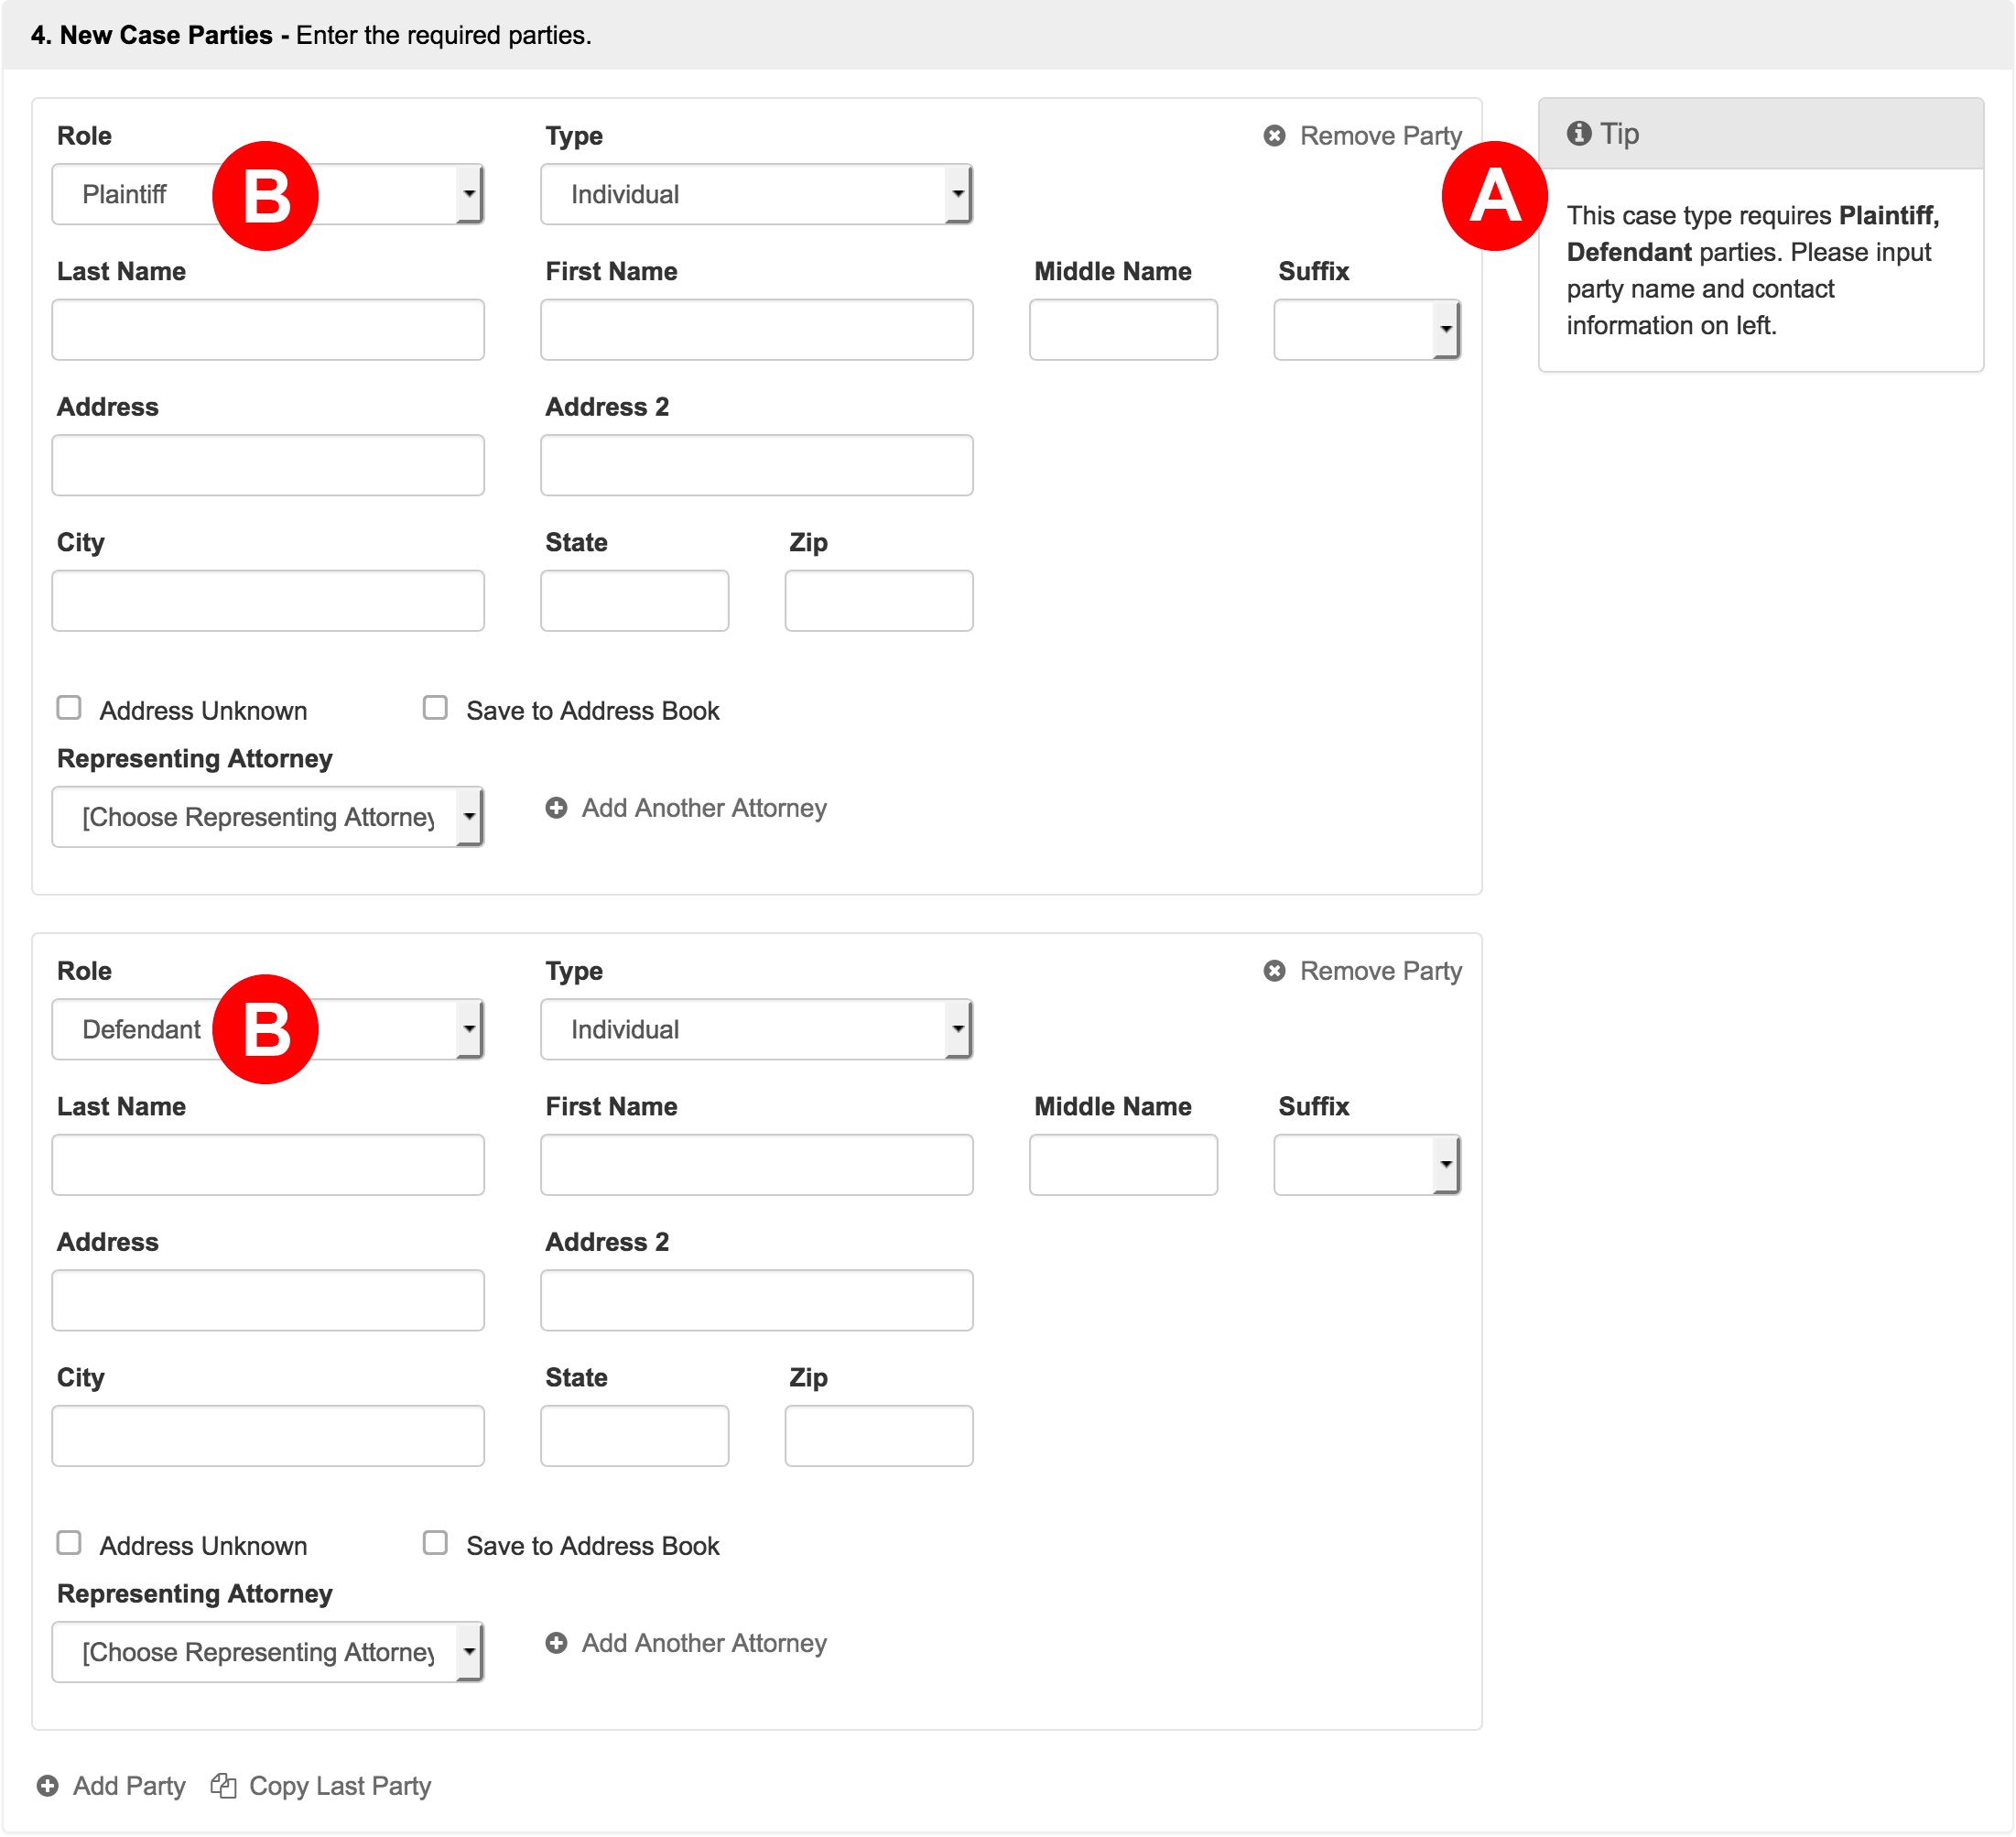
- Most states will alert filers to the roles they need defined via this Tip box.
- Some states will auto-populate the required roles in the parties section itself.
When filling out this section, you may select Representing Attorneys from the menu, or click the Add Another Attorney link to add them.
If you do not know your party’s address, you may click the Address Unknown checkbox.
- Filing Party – Choose the party or parties you are filing on behalf of. If you do not see your party listed, you may add them in the step above, and then come back to this section to select them.

- Service Contacts – Add service contacts to your filing to perform electronic service. If the court doesn’t list any service contacts, or a filer needs to add additional service contacts; click the Add Service Contact link. If the court lists service contacts that shouldn’t be there, a filer may only remove them if they added them; only the person who adds the service contact can delete a service contact. Learn More about Service Contacts

- Filing Fees – Select a payment method to pay estimated fees. The filing fees auto-populate from the court based on the case type, document type(s), and optional services filers select. If the fees seem incorrect to you, you may need to change one of these types.
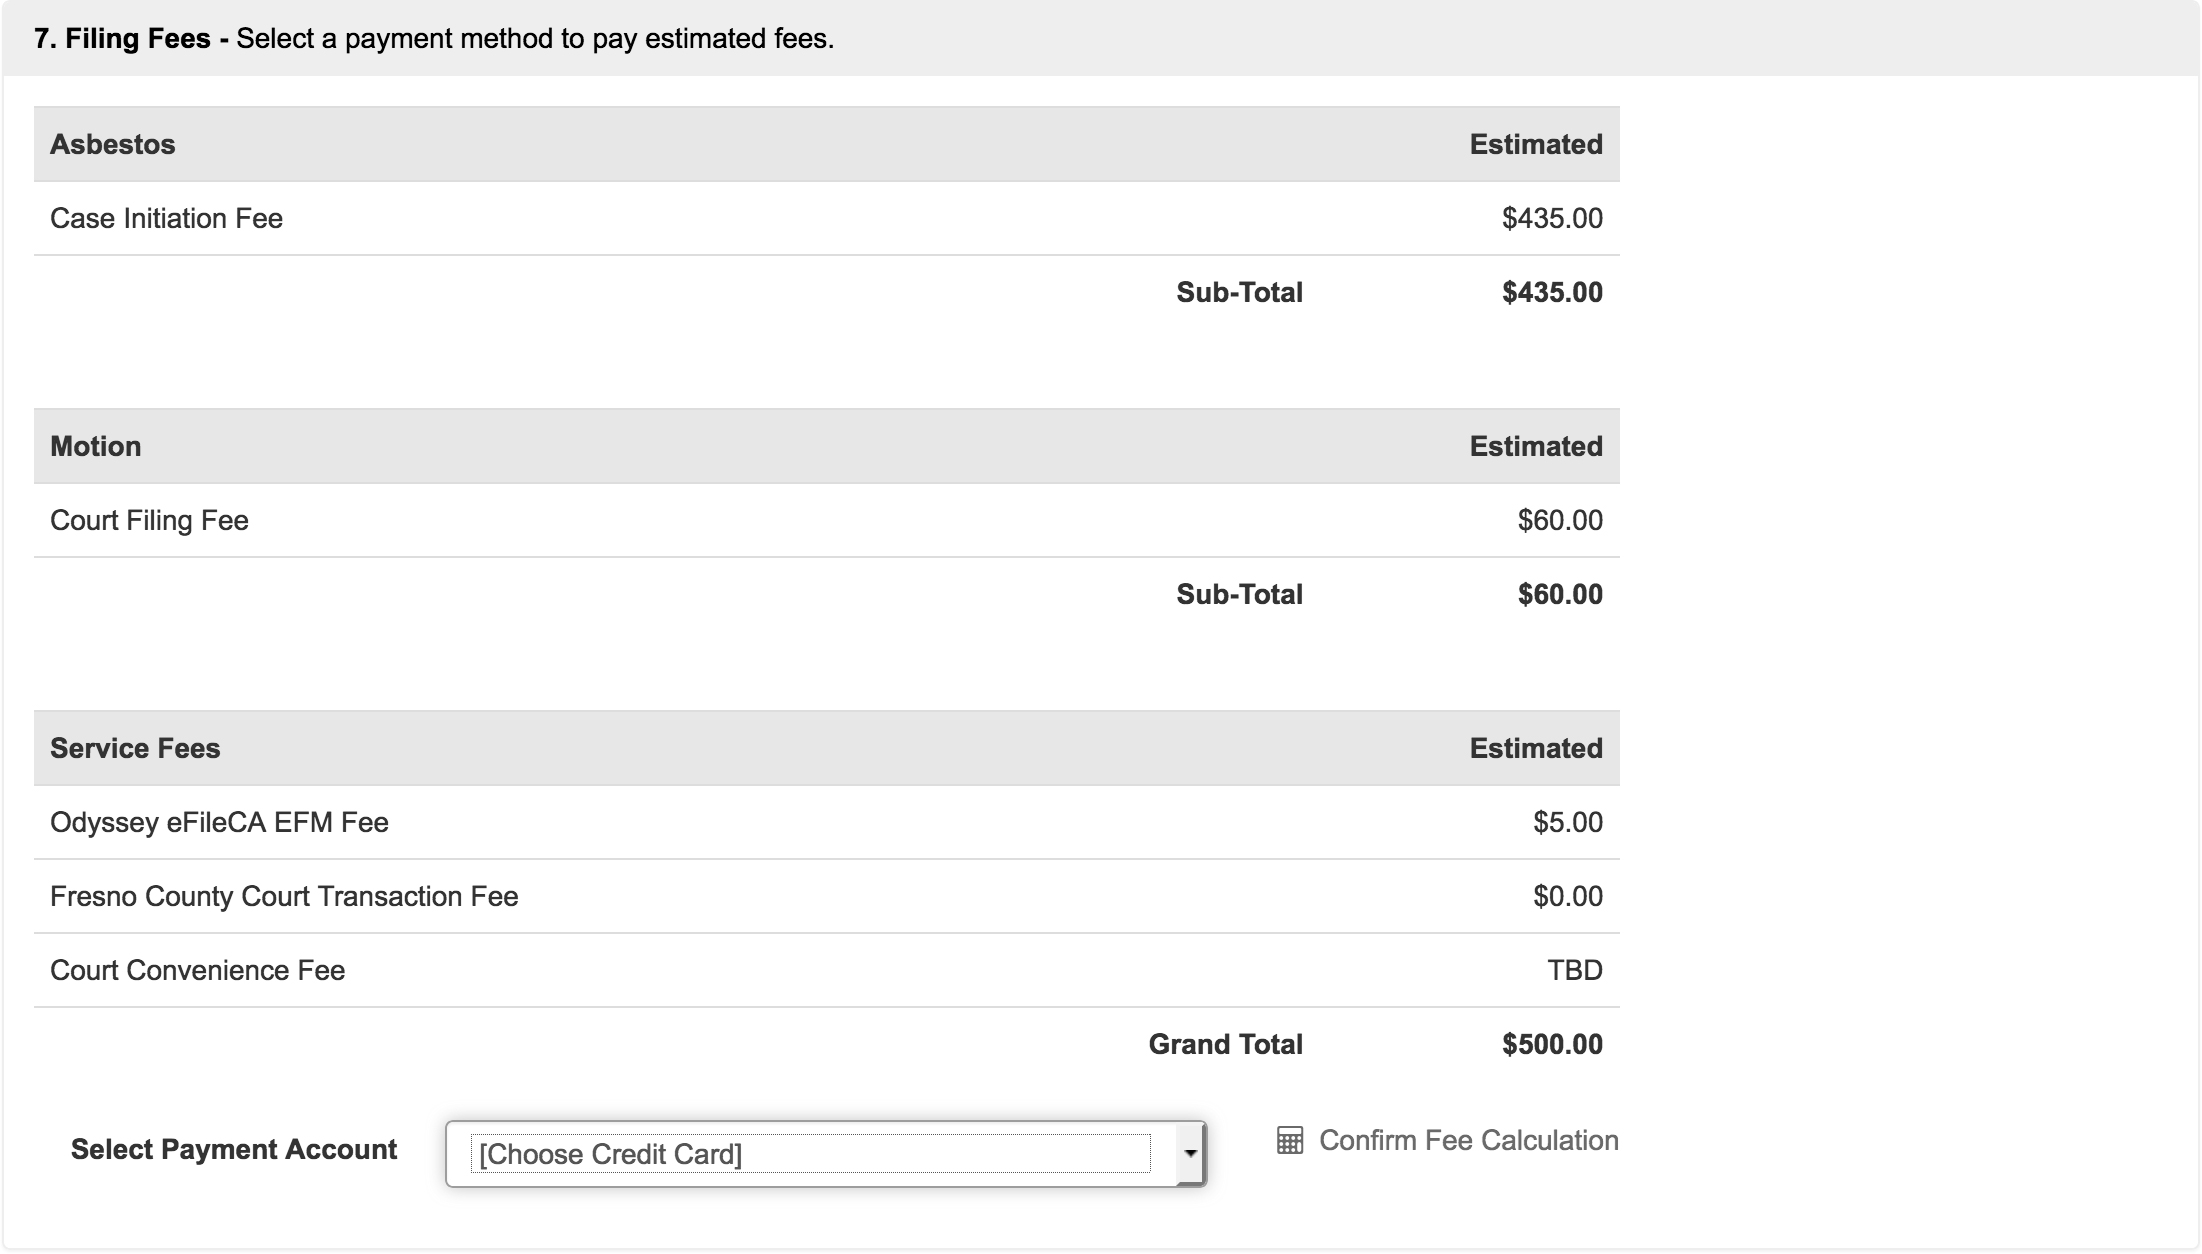
If you have a waiver of fees for your case, you will need to make sure to select a Waiver Payment type to avoid the charges listed in this section. To create a waiver payment account, click the Save Draft link on the upper right. Then click Settings at the top of the screen, and then select Payment Settings from the menu on the left. Next, you will click Add a Payment Account on the right side of the screen. Give the account a nickname, then select the account type as Waiver. Navigate back to your filing by clicking Filing Status in the left menu from the Dashboard, and choose this for the payment option. - Review & Submit – Finalize your filing, review, and submit.

- If you are Filing for an Attorney select them from the menu or click the Add Attorney link.
- When a firm uses any sort of Client Matter No, enter it here. If you want an unofficial copy of the filing to go to anyone associated with the case, like a client, enter their email(s) here. Note: this is different from a service contact, and it, along with the client matter number, are for your internal purposes only.
- If your court has the option to leave the clerk a memo, enter any sort of note here in the Note to Clerk box.
- Review your entire filing for accuracy, and check the Verify box to acknowledge you have and also agree to any service provider fees.
Click the Submit Filing button. Once filers click the button, the application immediately sends all documents to the court’s filing clerk for review. The system will then show the filing as Pending. The court assigns a submission time once the system completes its upload of all documents, and the court returns an Envelope Number.
Congratulations! You have submitted your filing to File on an Existing Case. The court will review it, and email you with a response in short time depending on their backlog. You can always go to the Filing Status page at any time to see where the filing stands.