Now that you have created and configured your new account, you are ready to e-file!
These instructions are to Initiate a New Case in Cook County, Illinois. If a case already exists in the court system, you will want to File on an Existing Case.
These steps take you through the process of starting a brand new case, and shows you how to electronically serve your documents on parties and / or attorneys in the case through the use of service contacts. Once filers submit a new case to the court, they will send email notifications to the filer on its status.
Note: To initiate a new case in Los Angeles Civil courts, follow the instructions from this article.
Note: To initiate a new case in all other courts, follow the instructions from this article.
Initiate a New Case in Cook County, Illinois
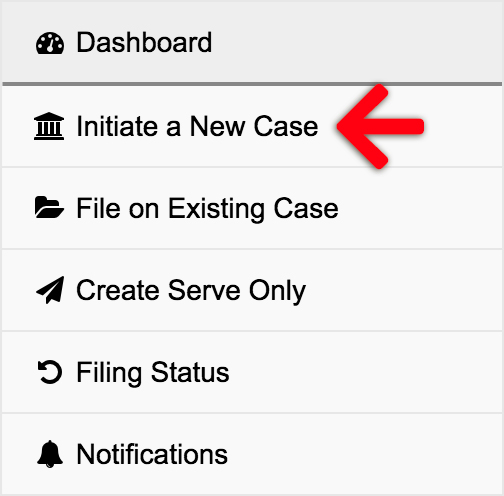
Click the Initiate a New Case link from the left menu of the Dashboard to begin:
1. Select Court & Case Type – Choose the court location and case type to file your new case.
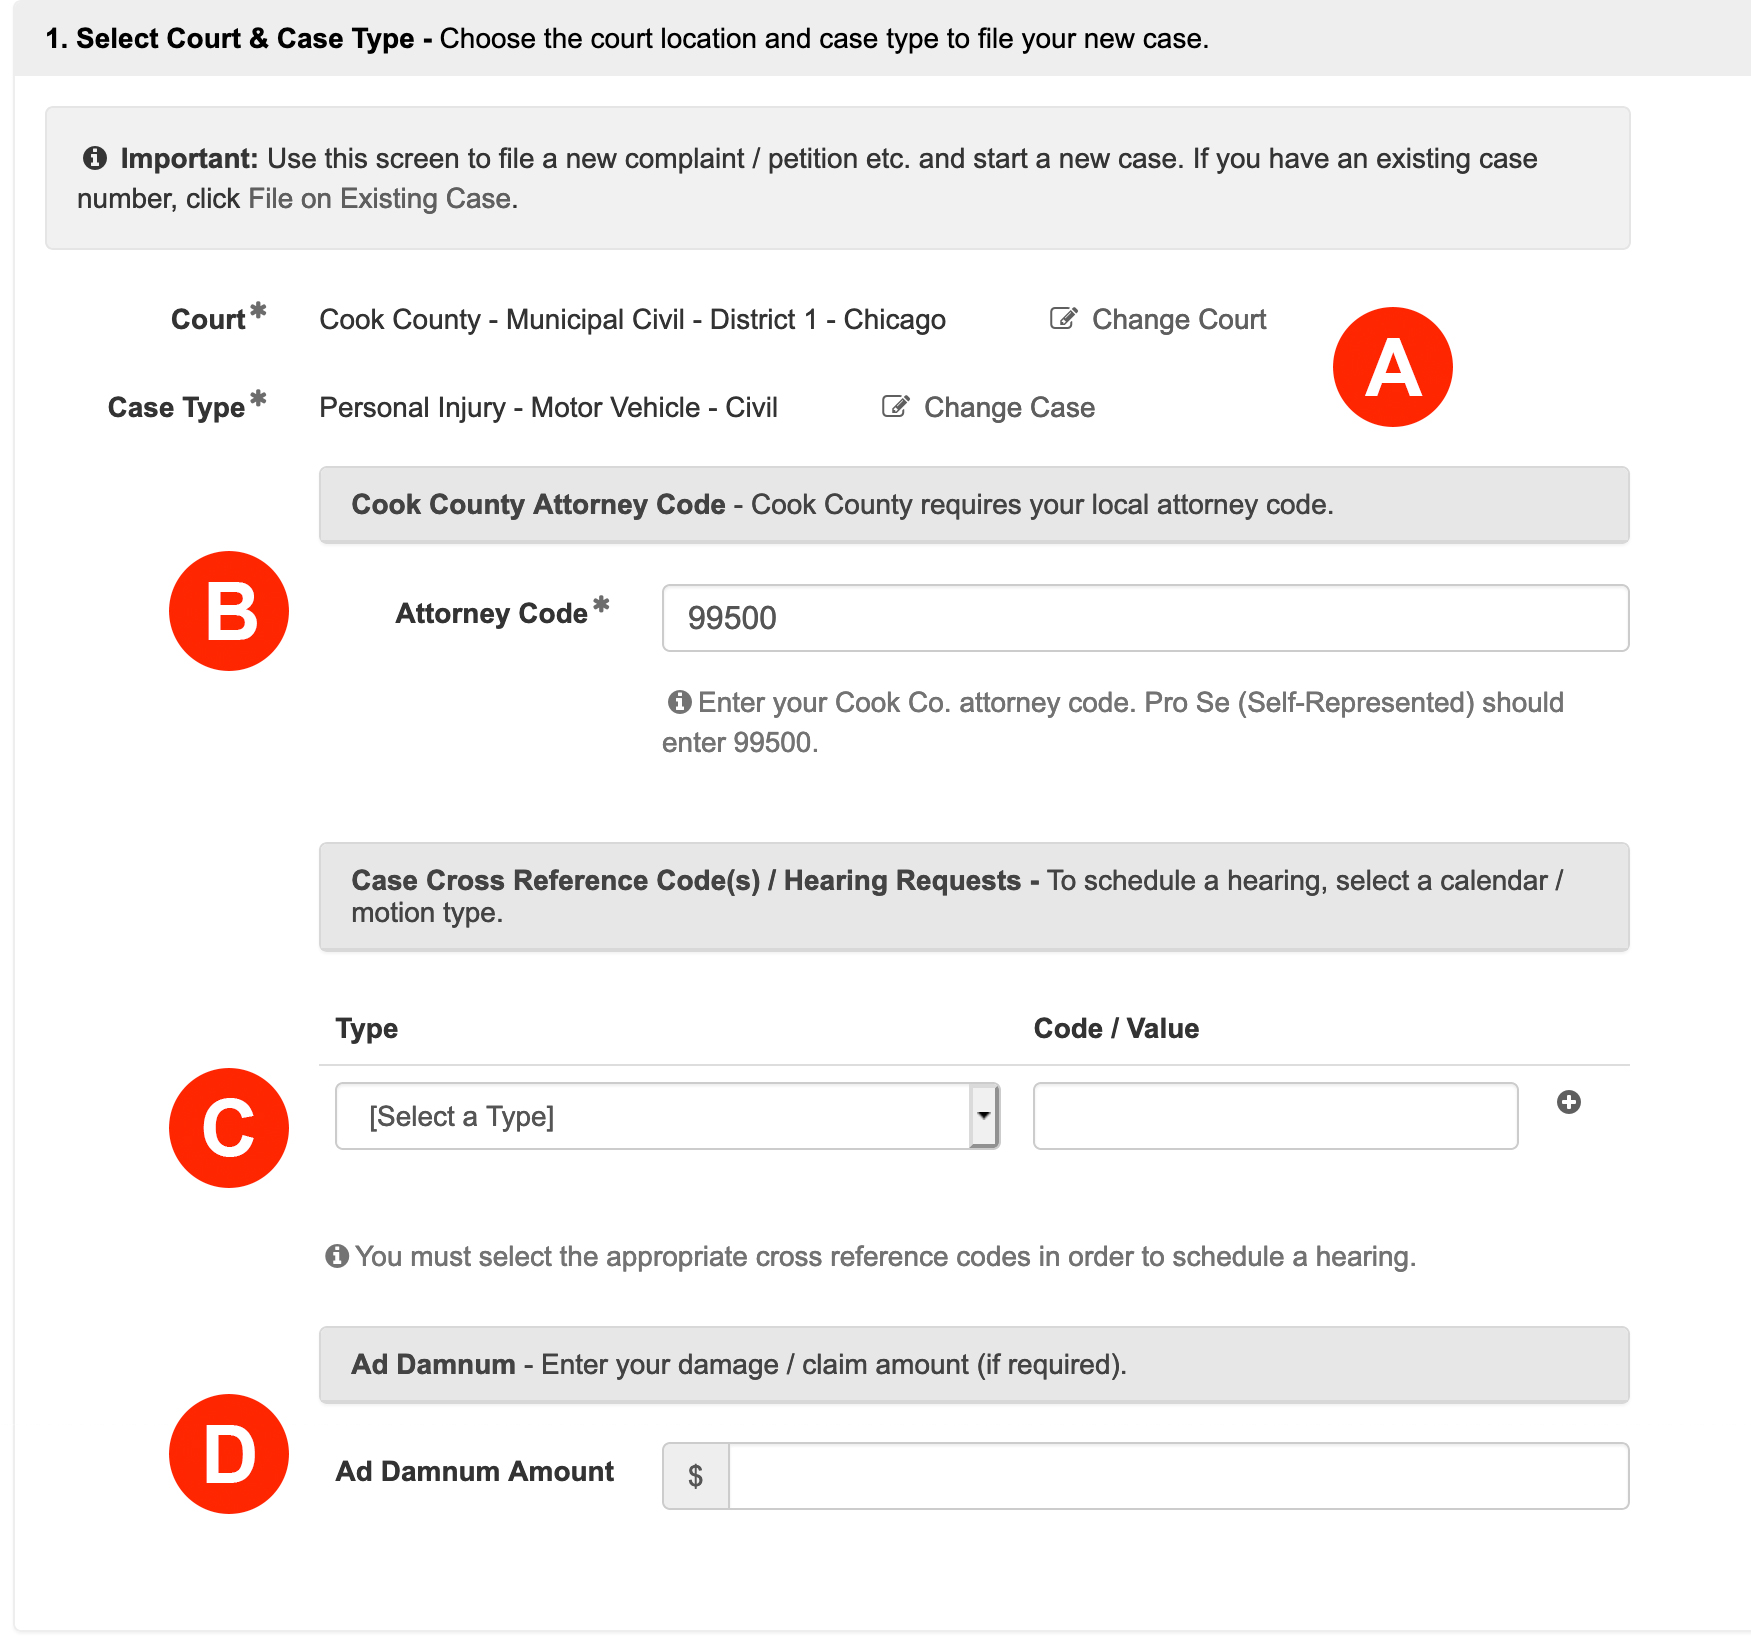
- Choose the court location and case type to file your new case.
- Enter your Cook County Attorney Code. Pro Se (Self-Represented) litigants will enter 99500.
- If a filer needs to request a hearing when the filing is pending, they will want to select a Motion Type from the drop down and then enter the word Motion for the Code / Value. Learn more…
Note: The choices in the Type drop down auto-populate directly from the court. If the correct calendar for the court does not appear, the filer will still need to select one of the choices here or they will NOT be able to schedule a hearing date while the filing is pending. In this situation, it is recommended the filer picks something, and then leave the clekr a note at the bottom stating the true calendar needed.COOK COUNTY MOTION TYPE UPDATE 7/12/2021
The Probate, Domestic Relations, and Domestic Violence (Civil) Divisions in Cook County have changed their method for selecting motion types in a filing. Please refer to this help article for their new procedure. - If an Ad Damnum is required, enter your damage/claim amount.
2. Add Documents – Define, select, and upload the documents that make up your filing.
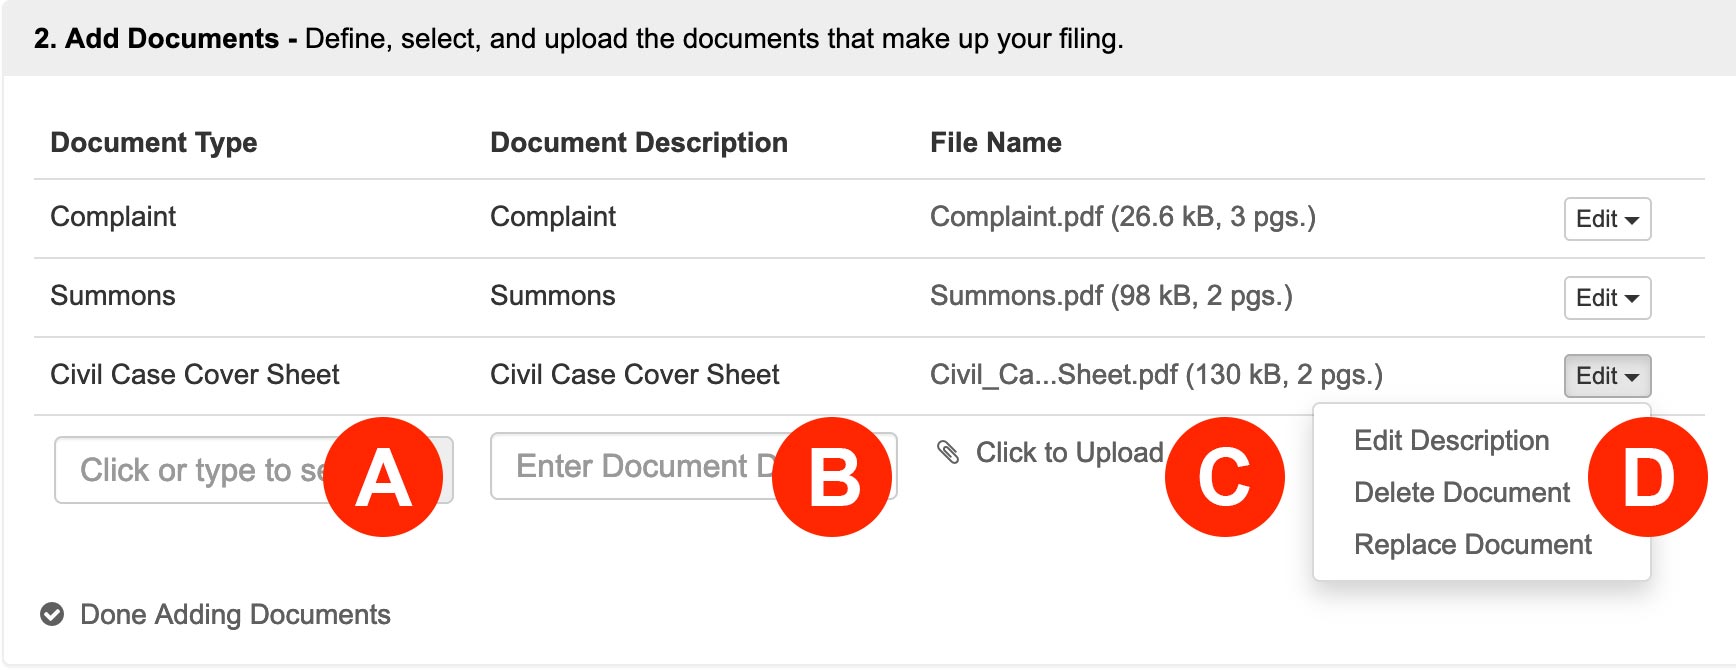
- Document Type – The Court prescribes the list of documents you see available in the Document Type field. If you don’t see the specific document type you are looking for then you’ll need to select the document type that most closely matches, or is somewhat generic in nature. Learn more about selecting a document type when the one needed isn’t listed…
- Document Description – After making your selection, type the true document title in the document description field.
- Click to Upload – Click the Click to Upload link to add your document. We’ll automatically convert most native file formats (i.e. Word, WordPerfect, JPG, PNG, GIF, TIF) into the Court’s preferred Adobe PDF format, upon upload.
- Edit – Click the Edit button to edit a description, delete a document, or replace a document.
3. Security & Optional Services – Choose a security level, and any needed optional services, for each document.
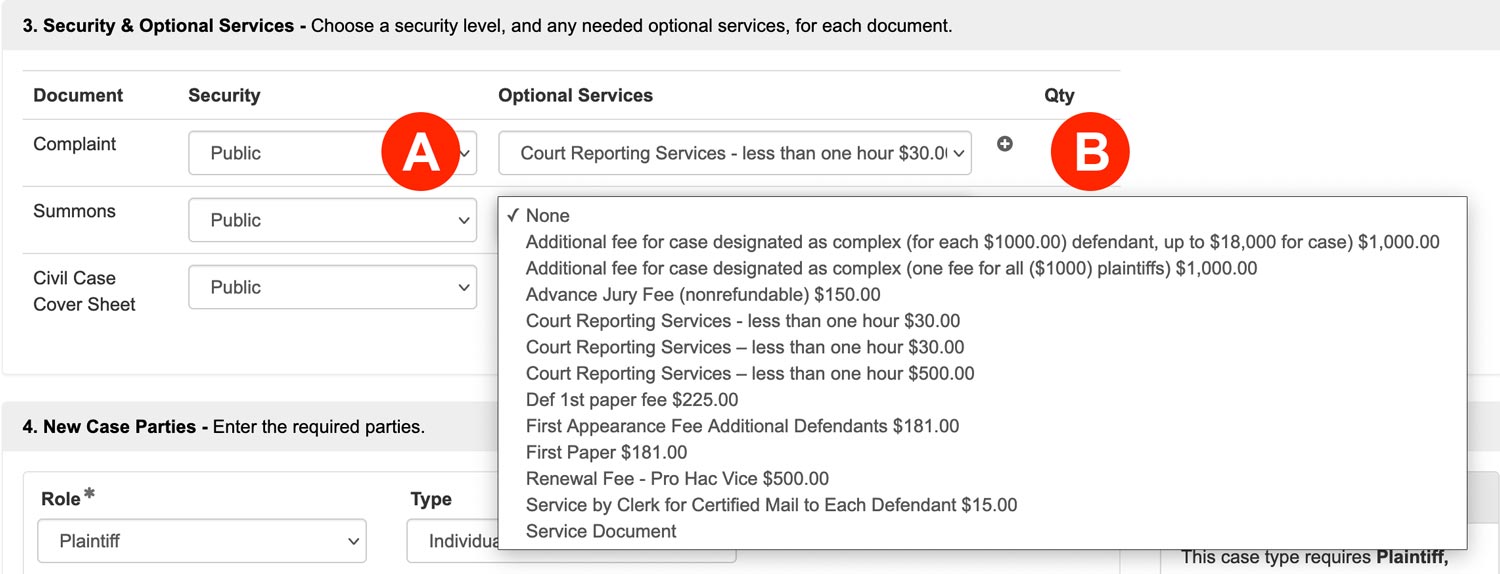
- Security – Most times your choices are public or confidential, but those choices will vary from court to court, and from document type to document type. You will need to pick something from the choices presented to you. While many people choose the public option, others choose confidential if there is sensitive information they do not think should be public.
If a filer sets a document’s security to confidential AND they do not want anyone served those documents, filers will NOT want to electronically serve any party. Electronic service sends ALL of the documents in a filing to ALL selected parties regardless of the document security type chosen. - Optional Services – When you initiate a new case or file on an existing case, you have the choice of adding optional services for the document(s) you are filing. This can be for extra fees or services like the court reporter fee or first paper fee, or for extra things like ordering certified copies (if the court offers it). There are many different choices that can appear here, so always be sure to check it before submitting a filing. You can also add a Qty to these optional services if you need multiples of something.
4. New Case Parties – Enter the required parties.
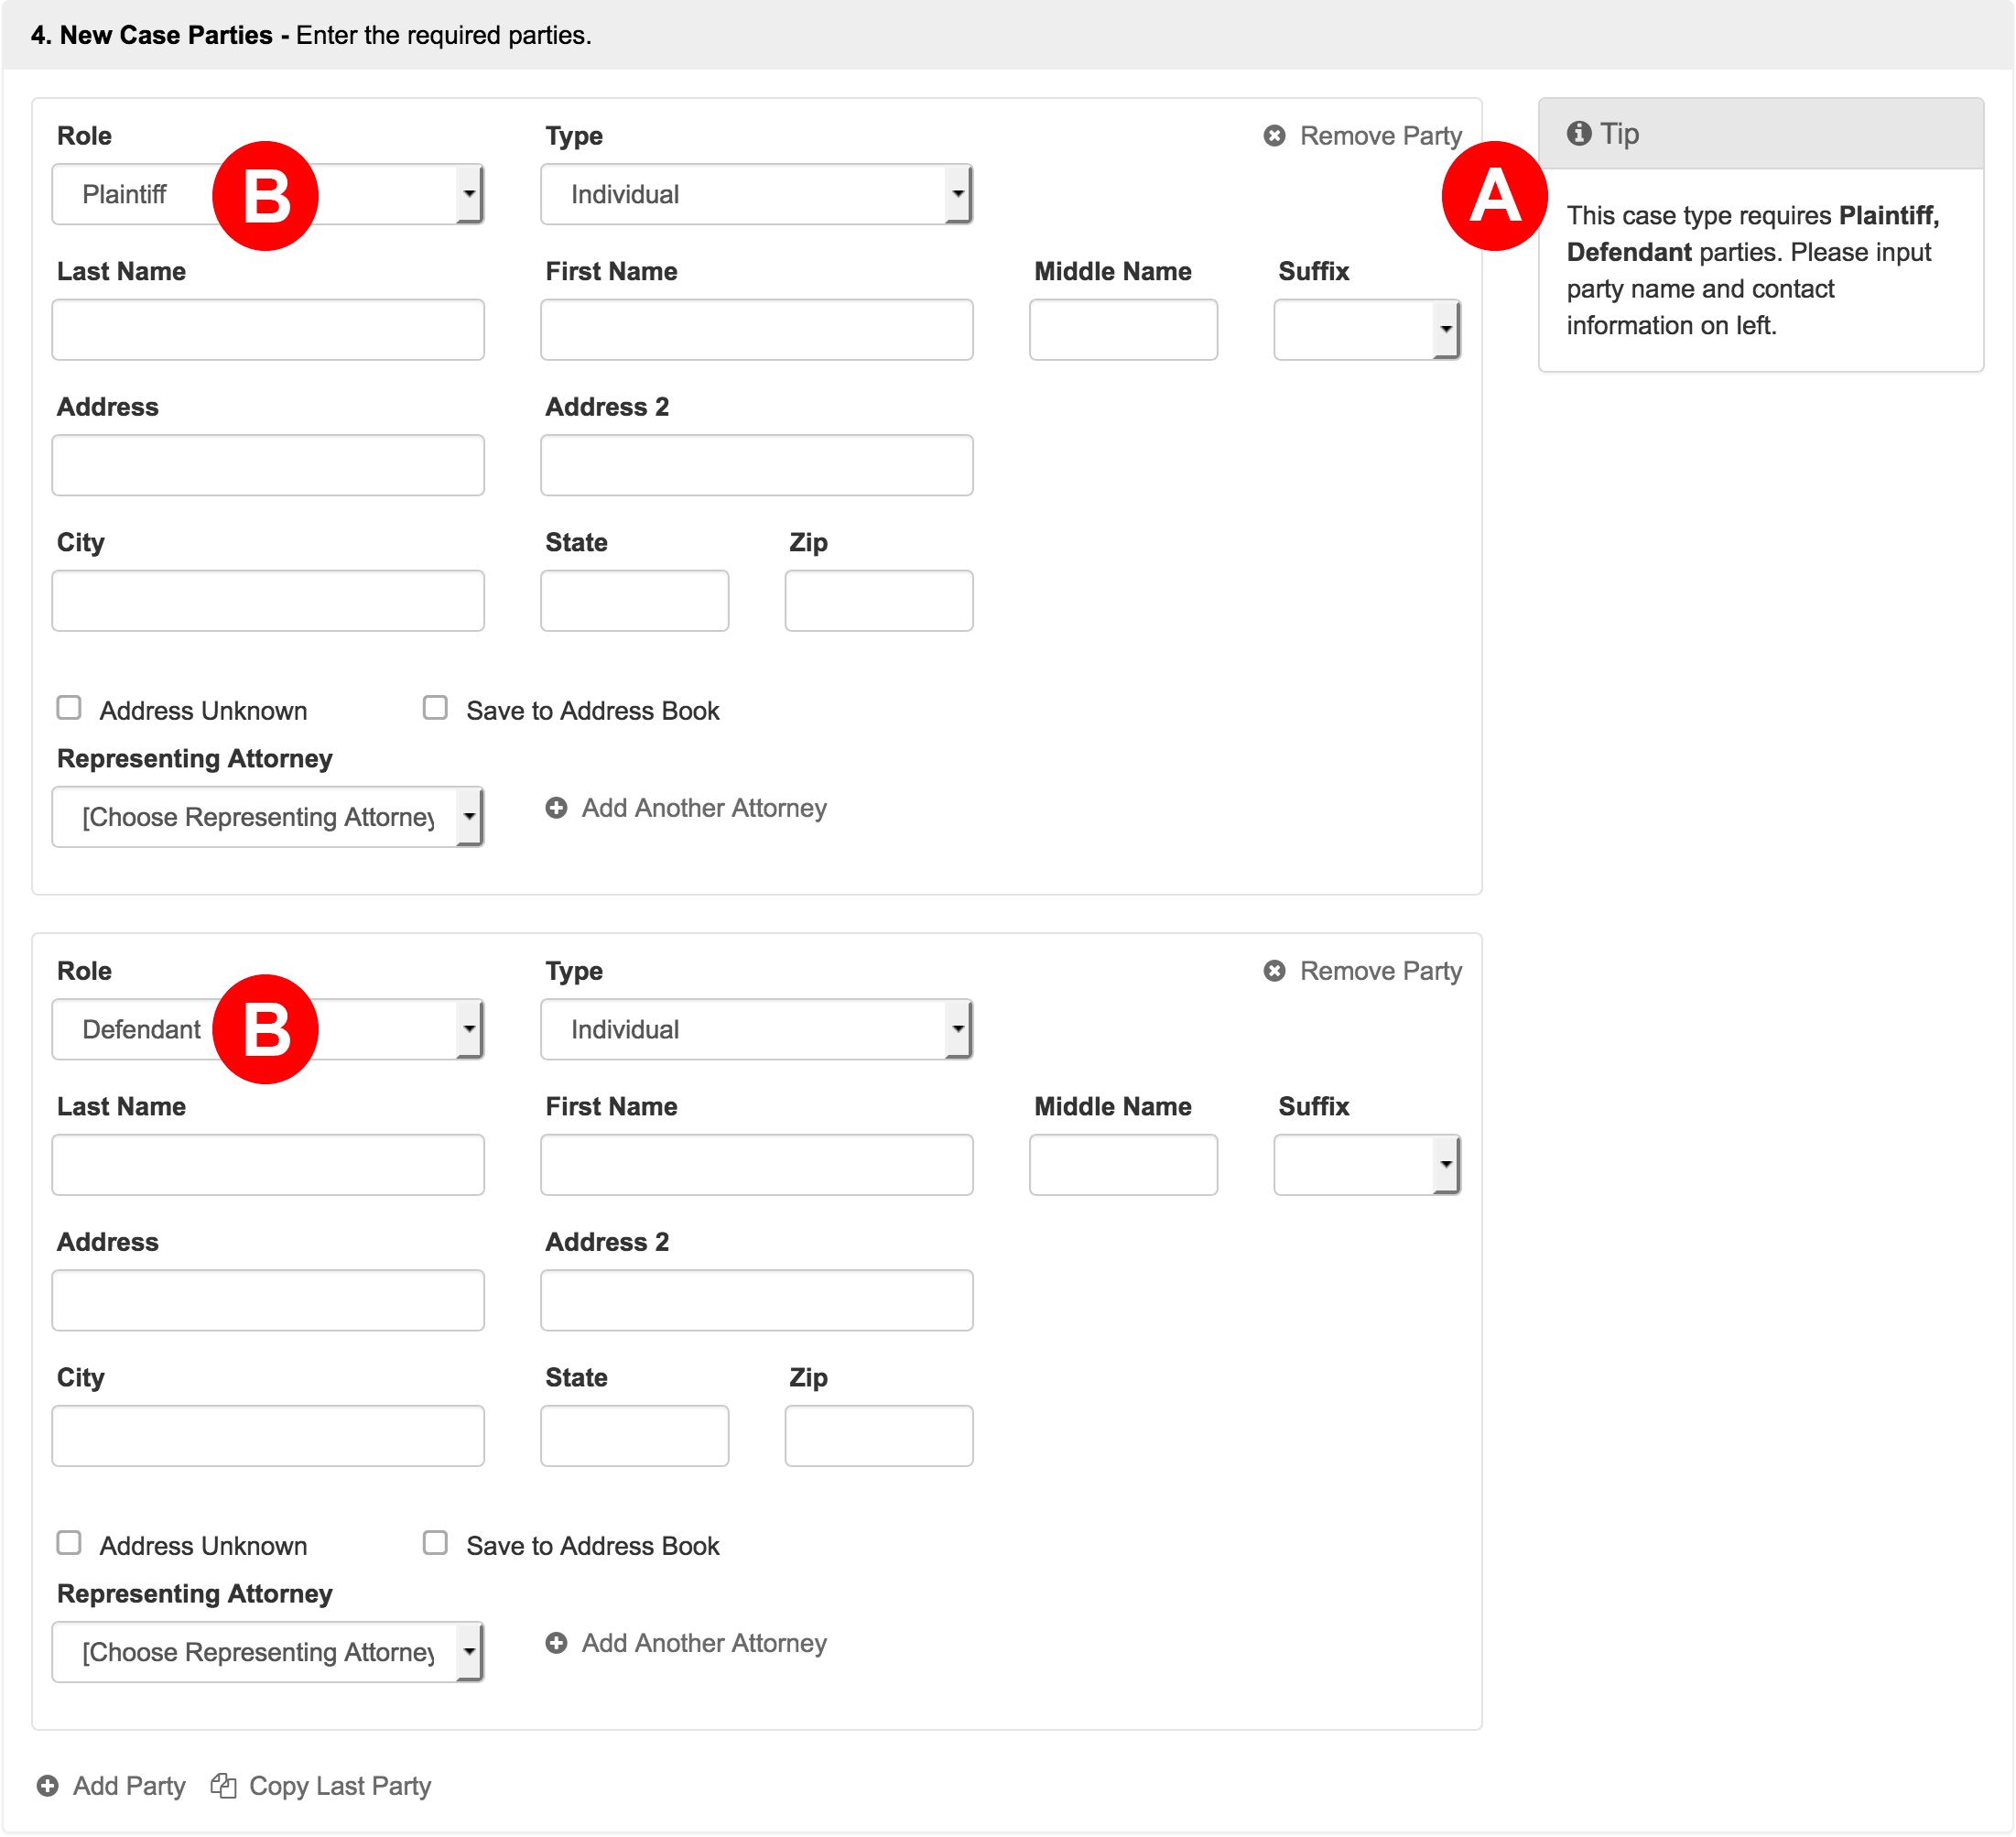
- Most states will alert filers to the roles they need defined via this Tip box.
- Some states will auto-populate the required roles in the parties section itself.
When filling out this section, you may select Representing Attorneys from the menu, or click the Add Another Attorney link to add them.
If you do not know your party’s address, you may click the Address Unknown checkbox.
You may add more parties by clicking the Add Party link at the bottom of this section, but you must still have the court’s required roles in order to file.
5. Filing Party – Choose the party or parties you are filing on behalf of.

6. Service Contacts – Add or select service contacts to perform electronic service. Service contacts provided by the court are annotated with and may not be edited.
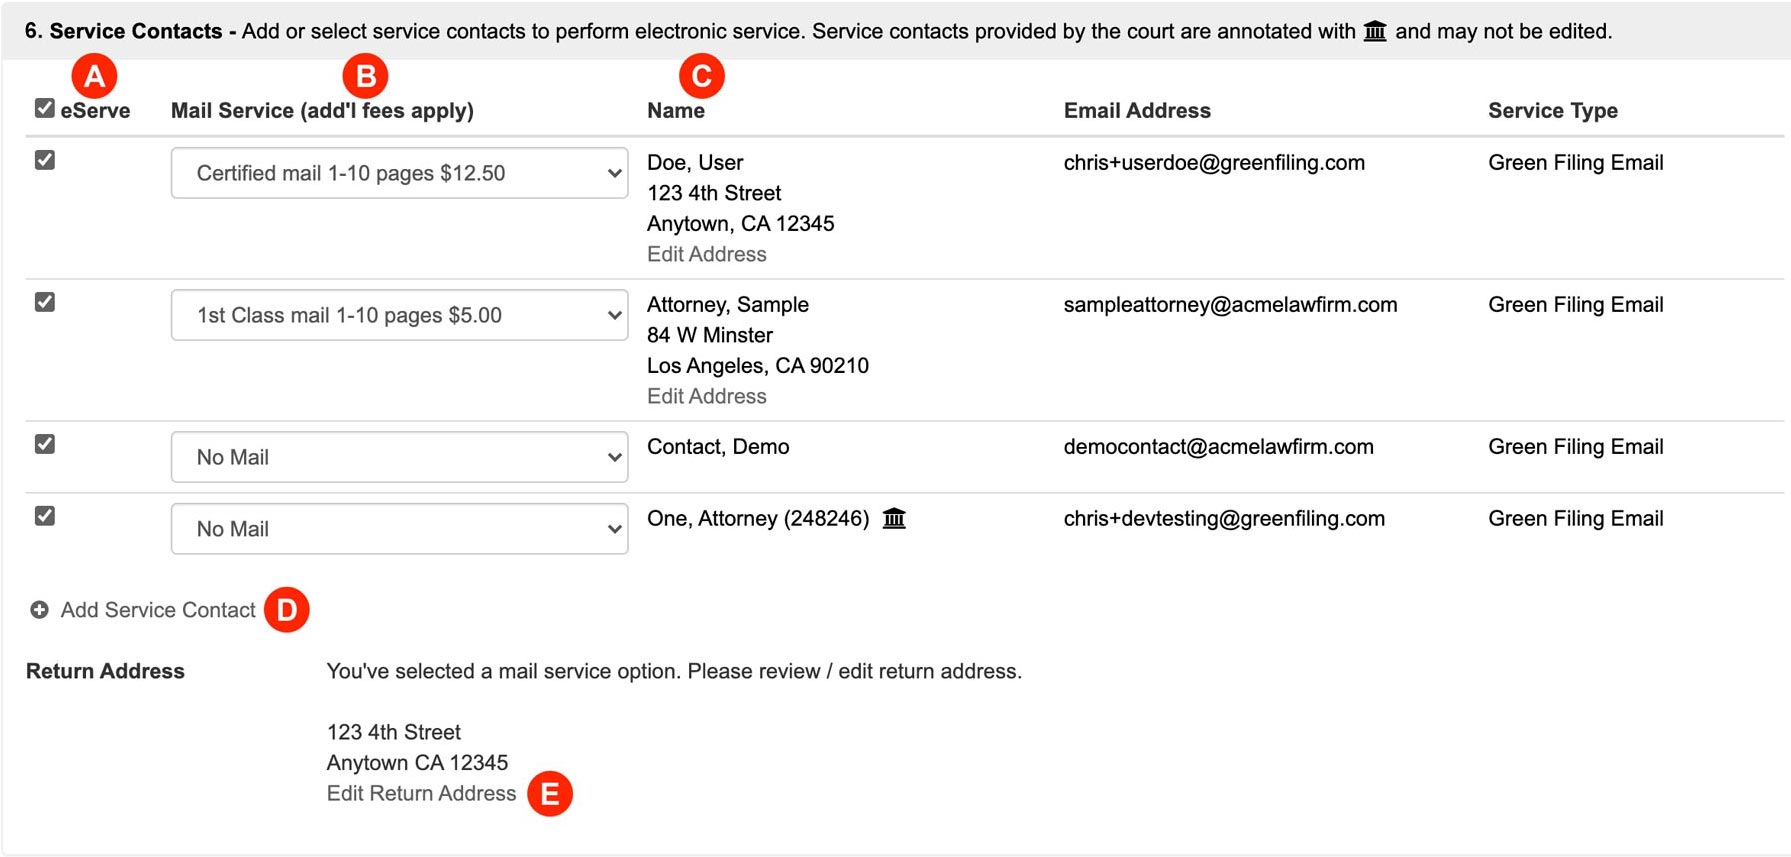
- eServe – Select (or deselect) any one listed to receive e-service. If no contacts are listed (or if a filer wishes to add additional service contacts), click the Add Service Contact link (Letter D). A filer may only edit or delete service contacts they originally added. Any service contacts annotated with is a contact directly from the court and may not be edited or deleted.
IF YOU DO NOT WANT THE OPPOSING PARTY (OR ANY PARTY) TO HAVE ACCESS TO A CONFIDENTIAL DOCUMENT NEVER E-SERVE THEM. E-SERVING A PARTY MEANS THAT YOU, THE FILER, CONSENTS TO THEM HAVING ACCESS TO THE DOCUMENT.
- Mail Service – Certified and First Class Mail – Starting in the fall of 2021, filers may choose to send the accepted documents to contacts via Certified and First Class Mail.
- Name – In this column, a filer may add or edit an address for Mail Service. However, only the contact’s name will show unless the filer selects a Mail Service type in the previous column.
- Add Service Contact – As always, filers may click the Add Service Contact link to add new contacts to a filing.
- Return Address – Filers will want to make sure the Return Address listed is correct for any returned Mail Service.
Learn More about Service Contacts and our new Mail Service via Certified and First Class Mail
7. Filing Fees – Select a payment method to pay estimated fees.
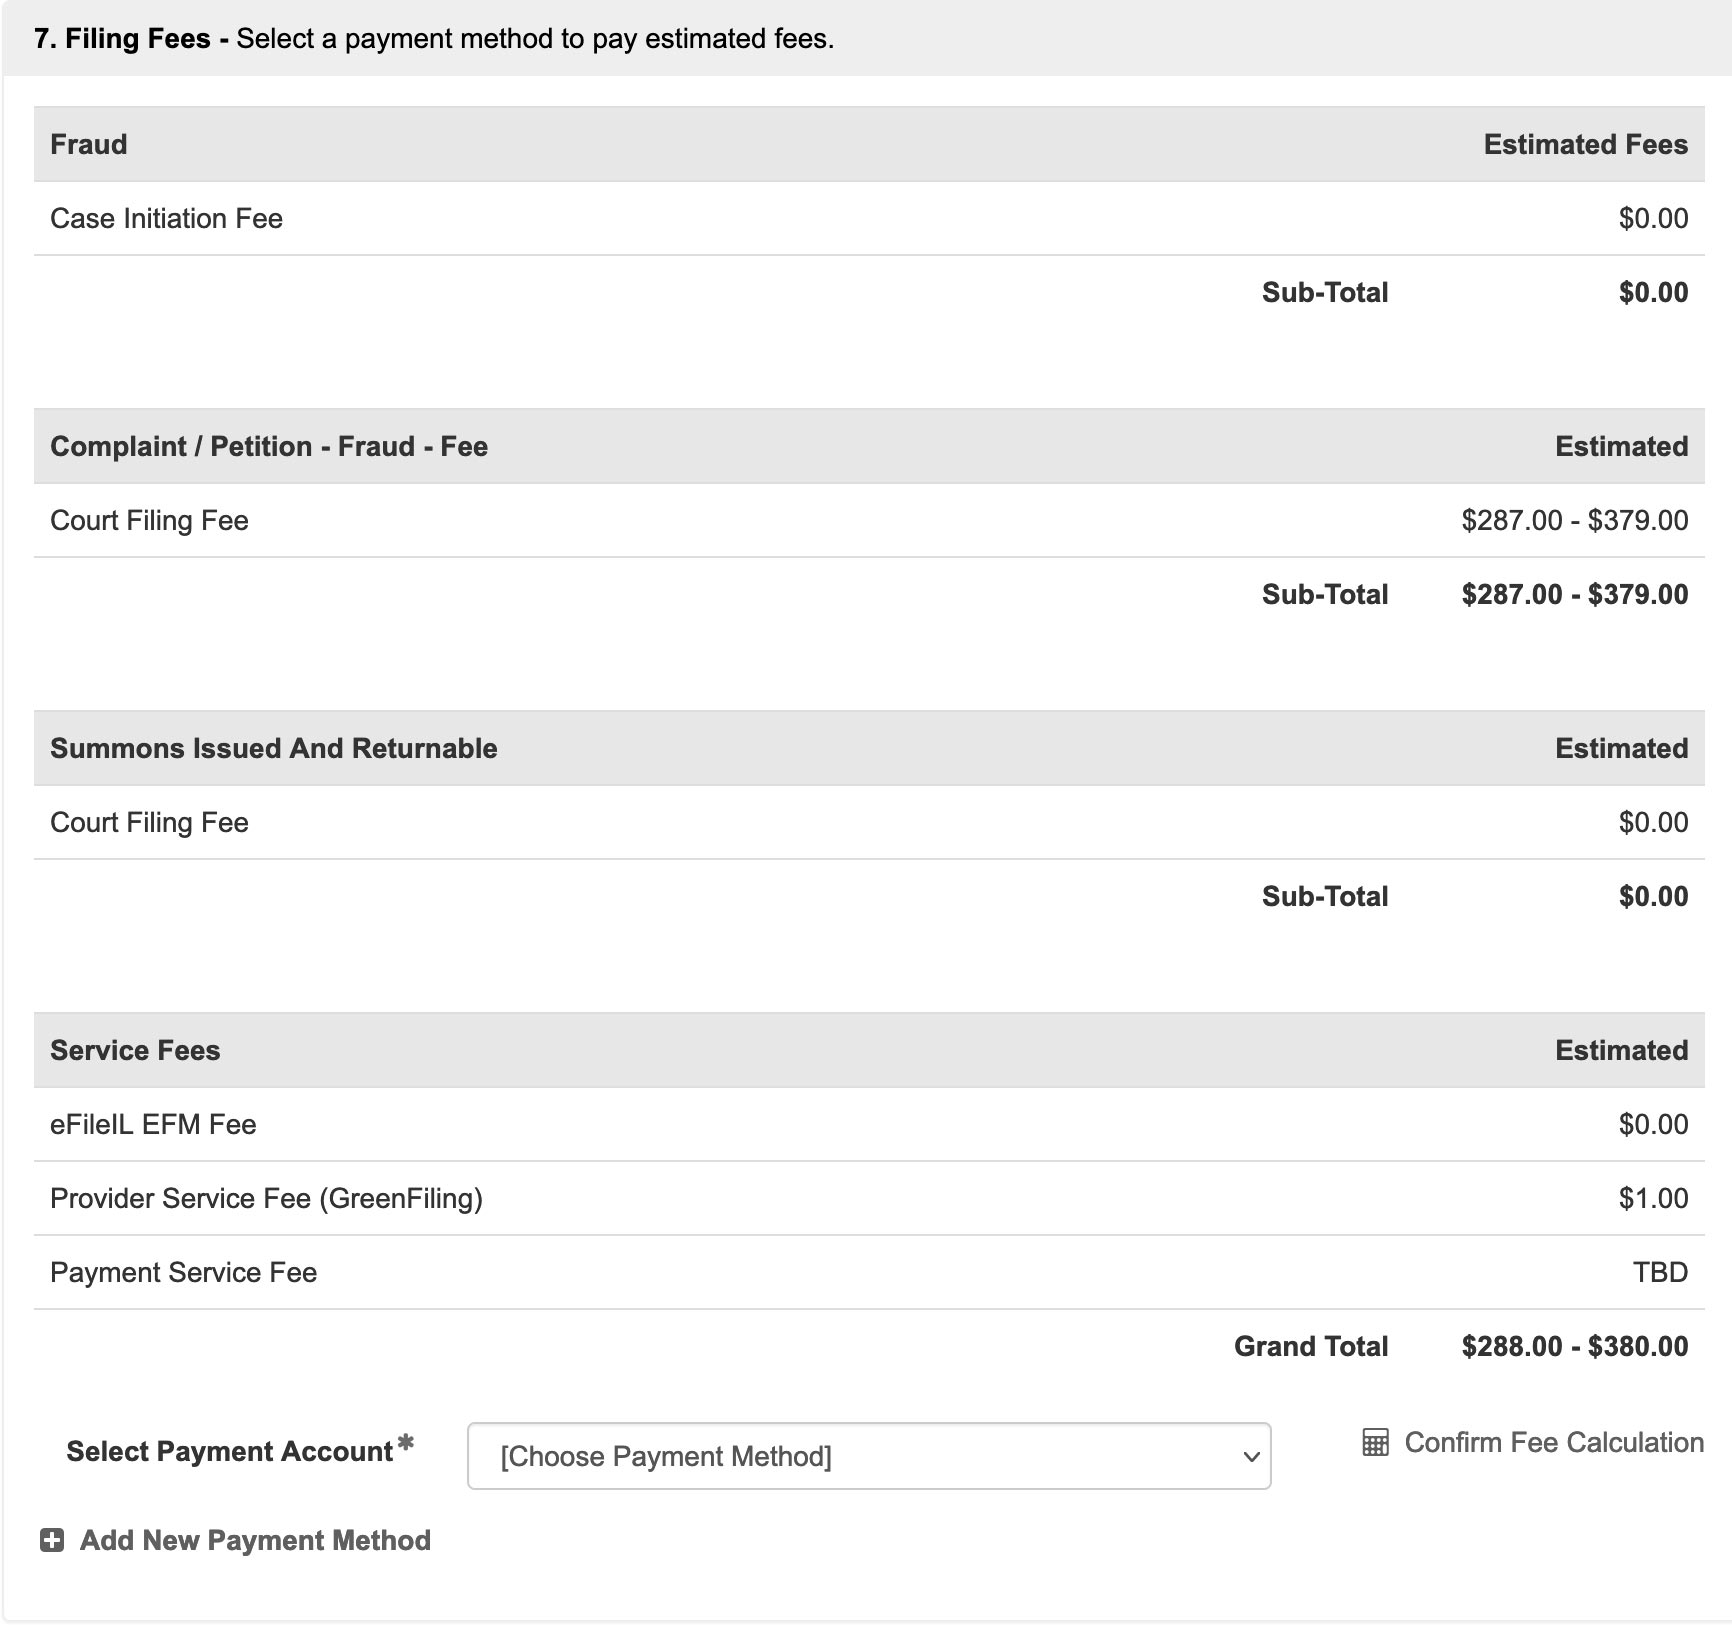
Confirm Fee Calculation
Click Confirm Fee Calculation to see the estimated fees. The filing fees auto-populate from the court based on the case type, document type(s), and optional services filers select. If the fees seem incorrect to you, you may need to change one of these types.
Waivers on a Case
If you have a waiver of fees for your case, you will need to make sure to select a Waiver Payment type to avoid the charges listed in this section.
Learn How to Create a Waiver Payment Account
8. Return Date – Select a return date for your filing. This is the date by which the opposing party must respond to your filing..
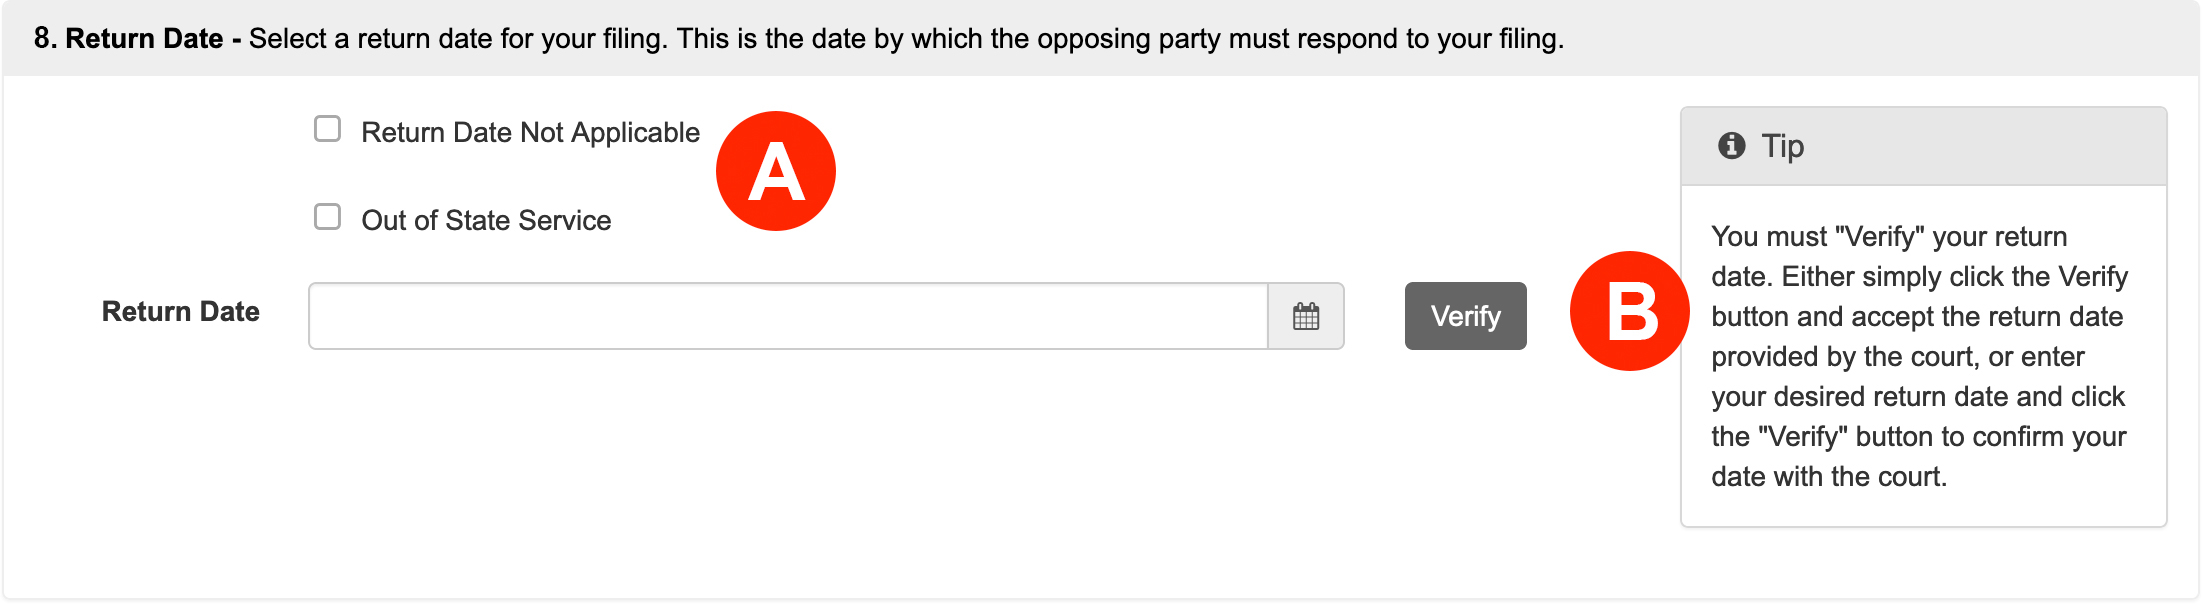
- If a Return date is not needed, check the Return Date Not Applicable box.
- Verify Button – If a Return date is needed, filers must enter and Verify the date.
If the system does not generate a return date, the filer may try leaving the filing clerk a message in the Note to Clerk field along the lines of “This filing needs a return date, and the Odyssey system is not providing one no matter how I request and validate, please assign a return date of mm/dd/yy”.
9. Review & Submit – Finalize your filing, review, and submit.
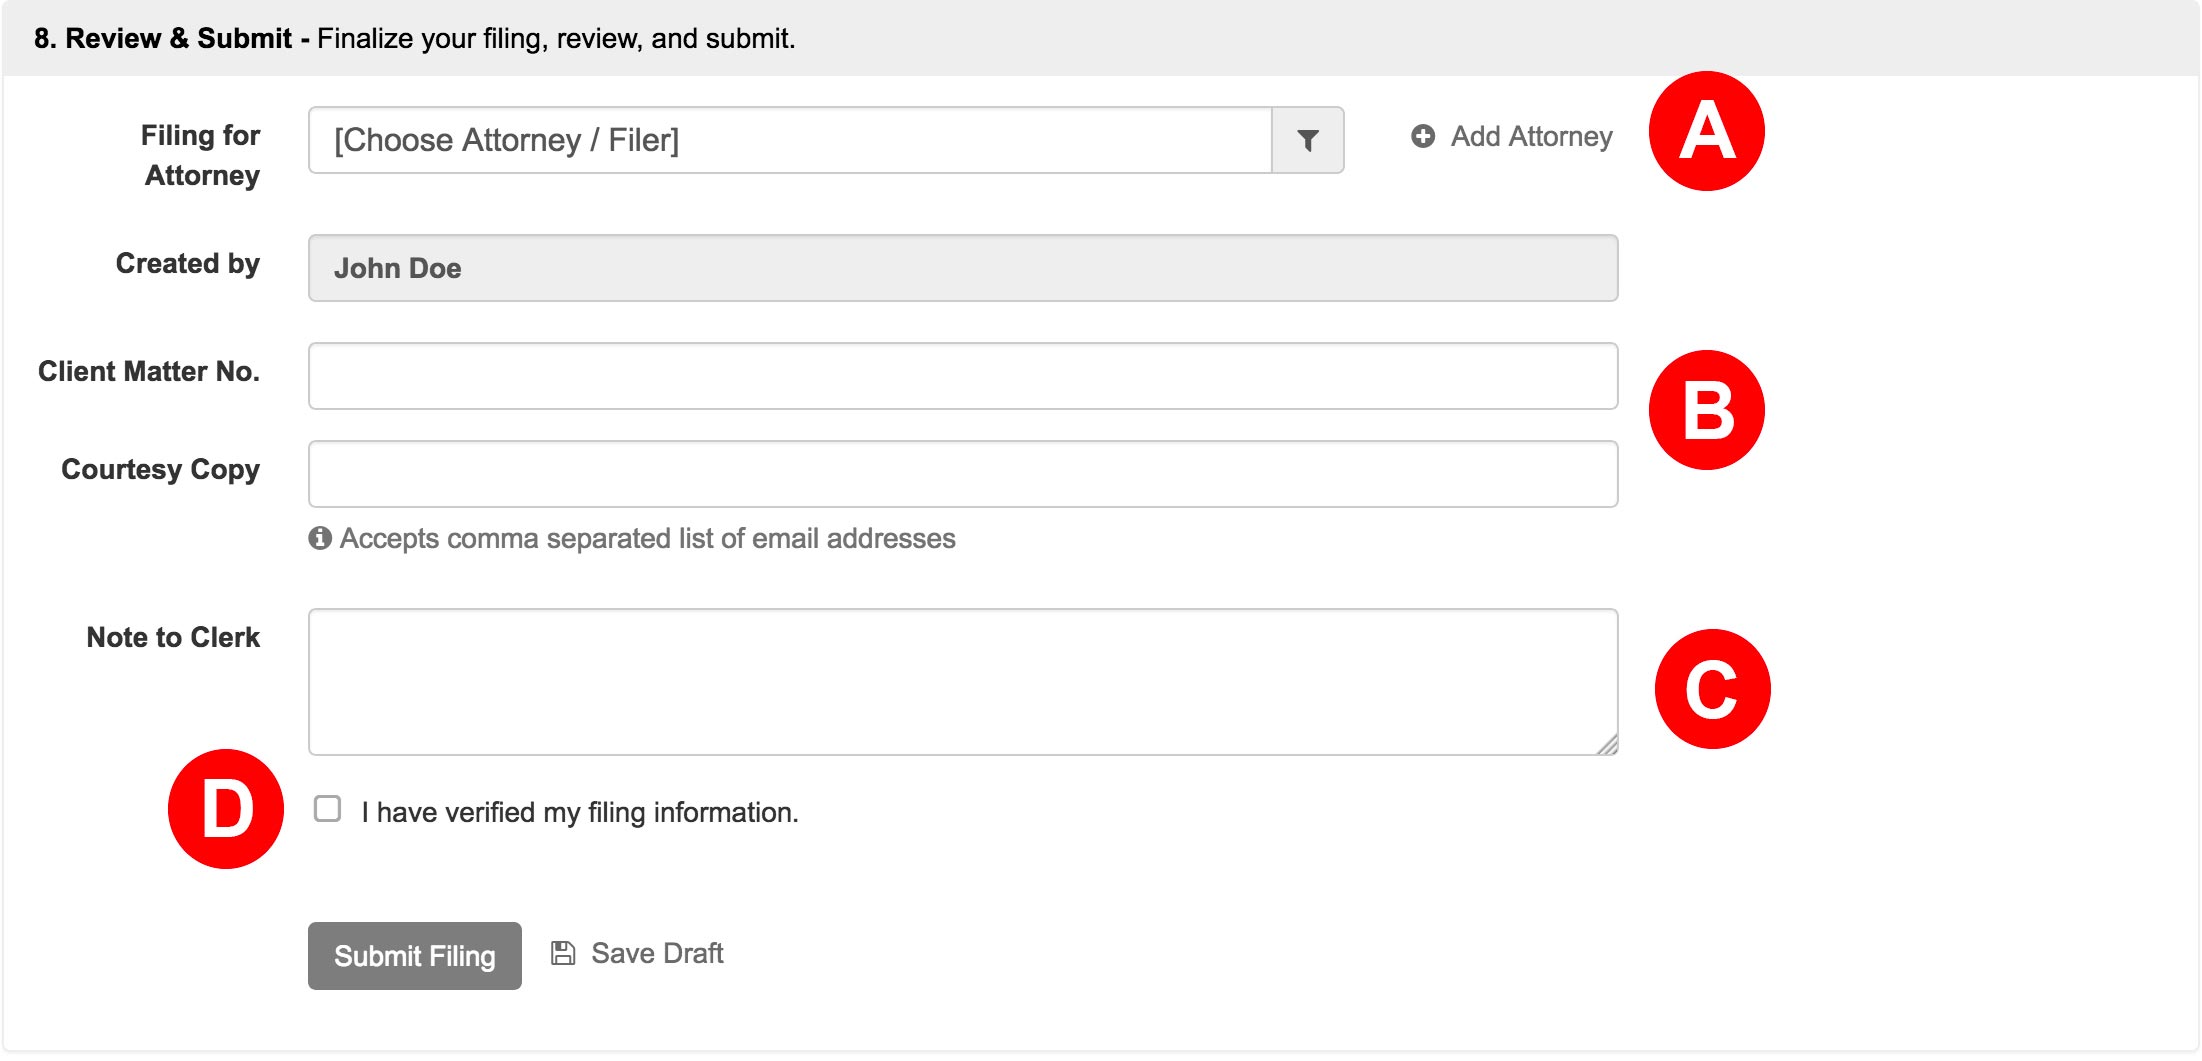
- If you are Filing for an Attorney select them from the menu or click the Add Attorney link.
- If your firm uses any sort of Client Matter No, enter it here. If you want an unofficial copy of the filing to go to anyone associated with the case, like a client, enter their email(s) here. Note: this is different from a service contact, and it, along with the client matter number, are for your internal purposes only.
- If your court has the option to leave the clerk a memo, enter any sort of note here in the Note to Clerk box.
- Review your entire filing for accuracy, Then check the box to acknowledge you have verified your filing information.
Submit Your Filing
Click the Submit Filing button. Clicking this button, sends your filing directly to filing clerk’s queue at the Court for review. Once all documents are successfully sent to them, the Court will return an envelope number with the date and time they received the full submission. This will be the date and time for the file stamp in your accepted filing. Any filing the Court receives weekdays after 11:59PM, on the weekend, or Court Holiday receives an accepted file stamp of the next Court business day.
On the Filing Status Screen, you will now see your filing is listed as pending. You may return to this screen at any time to see the current status for it and any other filing. Depending on the Court, it can take as little as a minute to review the submission to a few hours to a full business day. If it takes longer than that, the Court may have a backlog they are working through. If you are ever concerned about the status of a submission, the best thing to do is contact the Court directly and provide them with the Envelope Number on your filing.
10. Request a Hearing Date
If you need to request a hearing while the filing is pending, and you correctly entered the Case Cross Reference Code(s) / Hearing Requests information in Section 1, you may now do so as long as the filing is pending.
11. Pre-authorization of Fees
It is important to note that when you submit your filing, the court does a pre-authorization on your card for the filing fees. If the court rejects the filing, then they will not settle that pre-authorization, and it will eventually fall off your card within 3 to 10 business days from the date of the clerk’s rejection depending on your banking institution.
Learn more about the pre-authorization of fees